hdparm switches explained http://manpages.ubuntu.com/manpages/intrepid/man8/hdparm.8.html
First of all you have to install hdparm in linux.
hdparm tests conduct
http://www.slashroot.in/linux-file-system-read-write-performance-test
===============
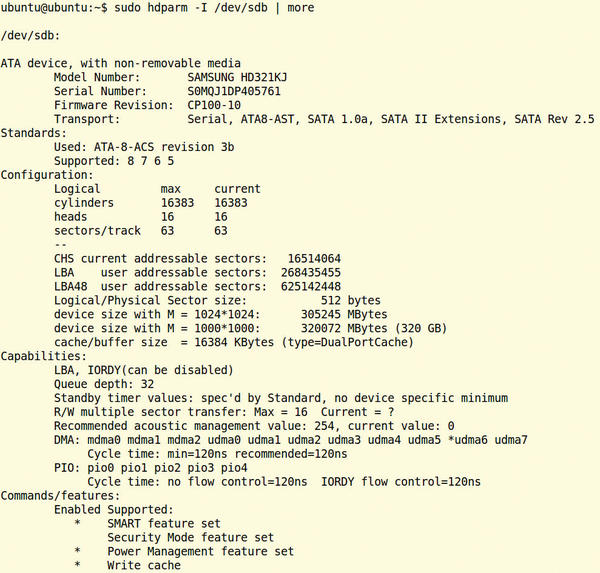 Figure 1: Hdparm lists the hardware properties of a six-year-old hard disk with a 320GB capacity.
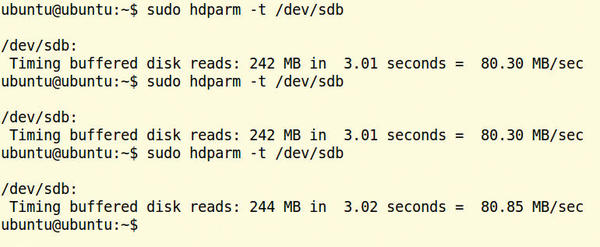 Figure 2: This SATA hard drive achieved an average read speed of 80.48 MBps.
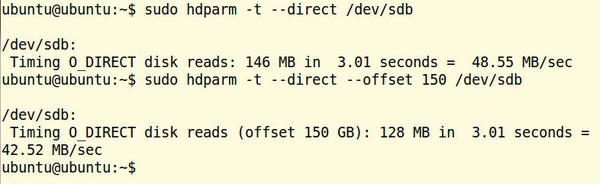 Figure 3: Without the buffer, transmission rate drops dramatically. At
the middle of the 320GB hard drive, more speed losses are seen.
Figure 3: Without the buffer, transmission rate drops dramatically. At
the middle of the 320GB hard drive, more speed losses are seen.
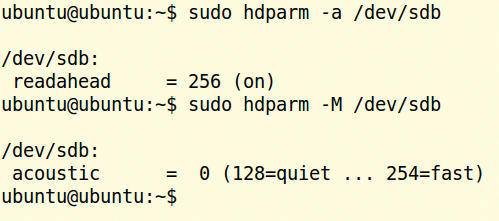 Figure 4: Here, the read-ahead is set to 256, and acoustic management is currently deactivated.
First of all you have to install hdparm in linux.
apt-get install hdparm
#hdparm /dev/sda
/dev/sda:
readonly = 0 (off)
readahead = 120 (on)
geometry = 8850/255/63, sectors = 142182912, start = 0
Hard disk Performance Information
# hdparm -tT /dev/hda
/dev/hdd:
Timing cached reads: 496 MB in 2.00 seconds = 247.42 MB/sec
Timing buffered disk reads: 60 MB in 3.03 seconds = 19.81 MB/sec
Hard drive set to low, slow settings
# hdparm -cuda /dev/hda
/dev/hda:
IO_support = 0 (default 16-bit)
unmaskirq = 0 (off)
using_dma = 0 (off)
readahead = 256 (on)
Use below tweaks to increase disk read write performance.
For sda drive
~]# hdparm -a 2048 /dev/sda
/dev/sda:
setting fs readahead to 2048
readahead = 2048 (on)
For sdb drive
[root@439298a ~]# hdparm -a 2048 /dev/sdb
/dev/sdb:
setting fs readahead to 2048
readahead = 2048 (on)
]# echo “anticipatory” > /sys/block/sdb/queue/scheduler
]# echo “anticipatory” > /sys/block/sda/queue/scheduler
hdparm tests conduct
http://www.slashroot.in/linux-file-system-read-write-performance-test
===============
hdparm -I /dev/sda | more
==============================
as administrator (Figure 1).
Figure 1: Hdparm lists the hardware properties of a six-year-old hard disk with a 320GB capacity.
The tool will deliver all available data about the chosen drive – in this case, the first hard disk sda. The | more option makes sure the large amount of information does not simply rush unread through the terminal.
Hdparm
accepts any device as mass storage that is connected to an (E)IDE,
SATA, or SAS interface, including, therefore, DVD drives and SSDs.
USB-to-IDE adapters often cause problems because they do not transmit
the (complete) ATA or ATAPI commands to the drive. The information that
hdparm delivers is dependent on the device. The designation and firmware
version number are always listed at the top under Model Number and Firmware Revision. Owners of an SSD especially can find out quickly whether they are running the current firmware version.
On newer hard disks, you should check whether Native Command Queuing (NCQ) is to be found under Commands/features.
This technology makes it possible for the hard disk to sort queries
from the system in such a way that the heads take the shortest possible
path. SSDs, on the other hand, distribute write accesses more
efficiently across storage blocks. Ideally, this leads to an increase in
speed. If NCQ is deactivated, check the BIOS to find out whether the
drive is running in AHCI mode, which is also necessary for other functions such as energy management.
Speedometer
To determine how fast a drive delivers data, use the
==================
hdparm -t /dev/sda command.
=================================
 After a few seconds, the data transfer rate appears (in megabytes per
second, MBps). The small program reads directly from the drive for a
while regardless of the filesystem. The speed measured is therefore
somewhat faster than in actual practice. To receive an untainted result,
 no other programs should be running during the measurement, and enough
main memory should be free. Repeat the measurement at least three times
and then calculate the average value. For a current model, the result
should reach at least 80 MBps (Figure 2).
Figure 2: This SATA hard drive achieved an average read speed of 80.48 MBps.
The Linux kernel deposits the
data retrieved from the hard drive into a buffer. To determine the speed
of the unadorned drive, you can use the
==============
hdparm -t --direct /dev/sda
===========================
command. Hdparm then reads the data directly from the disk. The values thus measured will be somewhat slower than without --direct, but at least you can see the pure transmission rate of the disk (Figure 3).
Figure 3: Without the buffer, transmission rate drops dramatically. At
the middle of the 320GB hard drive, more speed losses are seen.
Hdparm always reads the data from
the beginning of the storage device. Hard disks, however, tend to
deliver data somewhat more slowly from the outer areas of magnetic
disks; therefore, hdparm lets you set an offset (from software version
9.29 on):
======================
hdparm -t --direct --offset 500 /dev/sda
=========================================
The 500
stands for the number of gigabytes to skip. On a 1TB hard disk, the
command above would therefore deliver data from the middle of the disk.
As Figure 3 shows, reading speed drops quite markedly in the outer areas
of a hard disk.
All the speed tests introduced
here only give a first impression of possible problems and bottlenecks.
For a complete benchmark, however, you would also need to determine the
write speed, for example.
Faster, Faster
Some
drive properties can be changed while the device is in operation; for
example, most drives allow you to turn power management on and off. Just
which functions hdparm can change and activate on a hard drive can be
called up with
===============
hdparm -I /dev/sda
============================
and are found under Commands/features
(Figure 1). All functions found there and marked with an asterisk are
currently active, and hdparm can use the rest or at least activate them.
To
speed up data transmission, a hard disk usually reads several sectors
at the same time. How many it can deliver at the same time is revealed
by
==============
hdparm -I /dev/sda
==========================
and is listed after R/W multiple sector transfer: Max =. This value should also be found in the same line after Current =. If that is not the case, you can increase the value with:
=============
hdparm -m16 /dev/sda
========================
This instructs the hard drive always to deliver 16 sectors at once.
Curiously,
some hard drives run slower with higher values: The hdparm man page
mentions primarily older Caviar drives from Western Digital. In such
cases, you should reduce the number of sectors again or even turn the
function off completely, which is done with:
==============
hdparm -m0 /dev/sda
===========================
Beyond this, modern drives can even retrieve a few sectors in advance (“read ahead”). To define how many, use the -a switch (Figure 4, top) – for example:
hdparm -a256 /dev/sda
Figure 4: Here, the read-ahead is set to 256, and acoustic management is currently deactivated.
Here, the drive will read the 256
sectors in advance that are most likely the next to be requested.
Higher values speed up above all the reading of large files – at the
cost, however, that reading smaller ones takes longer. The current
setting is shown with
==============
hdparm -a /dev/sda
==========================
Beyond
that, many drives also possess a built-in, additional read-ahead
function. As a rule, therefore, you can leave the setting at the default
value.
How fast queries from the operating system reach the hard drive controller can be called up with
============
hdparm -c /dev/sda
======================
The value should be 32-bit; you can force this value with the -c3 switch.
Full Speed Ahead
Many
modern hard drives allow you to slow down the head movement. Although
doing so will increase access times, it will also reduce the noise
level. To find out whether your own hard drive offers this “acoustic
mode,” you can use this command:
============
hdparm -M /dev/sda
========================
If a number follows the equal sign, as shown in Figure 4 (bottom), the drive can be put into a quiet mode with:
==============
hdparm -M 128 /dev/sda
==========================
To reach the highest speed, use the maximum value:
================
hdparm -M 254 /dev/sda
===============================
Values between 128 and 254
are allowed, resulting in a trade-off between noise level and speed.
Incidentally, your Linux kernel must also support acoustic management,
which should be the case for all current major distributions.
Some CD and DVD drives turn out to be more like turbines: Their high-speed rotation can hinder audio/video enjoyment. The
===============
hdparm -E 4 /dev/sr0
===========================
command will provide relief. The parameter 4 determines speed, and /dev/sr0 specifies the DVD drive. This example slows drive reading speed ninefold.
Write-Back Caching
With
write-back caching, the hard drive first stores the data to be written
in a buffer. In this way, it can accept data much faster, which in the
end leads to a faster write speed. The
===========
hdparm -W /dev/sda
=====================
command shows whether write-back caching is active with a 1 after the equals sign; otherwise, you can activate the function with the -W1 switch.
If
hdparm will not allow this change, you need to make sure that
write-back caching has been activated in the BIOS. However, this
function is not recommended for all situations: In the case of a power
outage, the data in the buffer would be lost permanently.
If
a program sensitive to data loss – such as a database – is running on
the system, you should turn off the write-back cache with the -W0 switch. Documentation for the PostgreSQL database even explicitly recommends that this be done.
Live Wire
If
a hard disk or SSD doesn’t have anything to do for a certain period of
time, it automatically enters sleep mode. This power-saving feature can
be influenced with the -B parameter. Thus, using:
=============
hdparm -B255 /dev/sda
=========================
would deactivate energy management; however, not all drives allow this.
Instead of 255,
values between 1 and 254 are allowed. A higher value means more power
is used but also promises higher performance or speed. Values between 1
and 128 allow the drive to shut down, whereas values from 129 to 254
forbid that from happening.
The most power can be saved with a value of 1; the highest rate of data transmission (I/O performance) is achieved with 254. You can call up the current value with:
===========
hdparm -B /dev/sda
=====================
The
specific effect the different values will have depends on the drive
itself. However, you should keep in mind that too many shutdowns are not
good for desktop hard drives: Each time it shuts off, the drive must
park the heads, which increases wear and tear. Consequently, you
shouldn’t wake your hard drive up every two seconds – which always takes
more than two seconds to do.
You can set how many seconds of idleness the hard drive should wait before it goes to sleep with the
============
hdparm -S 128 /dev/sda
======================
switch;
however, this value here is not in seconds but a number between 1 and
253. The hard drive multiplies this value by another. The value chosen
in the example, 128, lies between 1 and 240, for which the drive
uses a factor of five. Consequently, it would shut down after 640
seconds of idleness.
From 241 and up, the
multiplication factor increases steadily. At 251, the waiting period has
increased to 5.5 hours. At 253, the value is preset by the
manufacturer, usually between eight and 12 hours. The value 254 is left
out; at 255, the drive will wait 21 minutes and 15 seconds. A value of 0
will deactivate sleep mode completely. To send the hard drive to sleep
immediately, enter:
============
hdparm -y /dev/sda
=====================
With a capital Y,
the drive will go into an even deeper state of sleep. Depending on the
drive, the drive might only wake up from a deep sleep after a reset of
the whole system.
Cleanup
SSDs
track the location of the data deposited on them independently of the
operating system. This can lead to the curious situation that a file has
been deleted but the SSD still has its former location marked as
occupied. To remedy such conflicts, newer versions of hdparm include the
wiper.sh script. Entering
wiper.sh /dev/sda
determines
which blocks are being used and which are not and reports this to the
SSD. However, this script must be used with caution: The documentation
warns explicitly that data could be lost and advises against its use
with the Btrfs filesystem. Drives with ext2/3/4, Reiser3, and XFS should
be mounted as read-only before using the wiper command. It would be
best to unmount the drive completely or start wiper.sh from a
Live system. In any case, you should definitely make a backup of the SSD
beforehand and use the script only in an emergency. Incidentally,
because wiper is so dangerous, some distributions do not even include
it.
Secure Deletion
To
achieve higher transfer rates and spread use equally over the storage
chips, SSDs also reserve some storage areas (wear leveling), so that
simply formatting an SSD will seldom delete the whole drive. Most SSDs
therefore offer a function called secure erase, which causes the drive to empty all its storage cells. This is especially useful should you decide to give up your used SSD.
Secure
erase has two pitfalls: hdparm can only initiate a secure erase when
the BIOS also allows it. Beyond that, the method is considered to be
experimental. The documentation warns explicitly about using the
procedure because, in the worst case, secure erase could make the whole
SSD unusable. If you want to use this delete function anyway, first call
up the identification information with:
hdparm -I /dev/sdb
Under Security, the line supported: enhanced erase
should show up somewhere; otherwise, the SSD won’t support secure
erase. Next, turn on the security function of the drive by (temporarily)
setting a password like 123456:
hdparm --user-master u --security-set-pass 123456 /dev/sdb
When you call up the identification information again, you will now find enabled under Security. To erase the SSD now, enter:
hdparm --user-master u --security-erase 123456 /dev/sdb
In
the process, hdparm also removes the password. The whole process takes a
few minutes, depending on the size of the SSD, during which no feedback
is given.
Afterward, when you call up the identification information, the area under Security should again look like it did before setting the password.
Relics
In the case of older hard drives with an IDE connector (also called PATA), you should take a look at the using_dma
line in the identification output. With the help of DMA (Direct Memory
Access) technology, the hard drive itself deposits data directly into
main memory. If the respective flag is 0 (off), it will slow down
the data transfer. Over the years, ever faster DMA standards have been
introduced; the fastest possible can be activated with the command:
hdparm -d1 /dev/hda
On
some very old systems, however, the DMA mode can cause problems. After
activating it, you should therefore copy a few larger test files to the
drive. If problems arise or the drive crashes, deactivate the DMA mode
again with:
hdparm -d0 /dev/hda
Incidentally, modern SATA drives always use DMA.
While
the hard drive is transferring the requested data, the rest of the
system can go about completing other tasks – but only if an on appears after unmaskirq in the identification info output. You can force this mode with the -u1 switch.
Lasting Values
After
restarting the system, all changes made with hdparm are lost. To
activate them permanently, the respective hdparm commands must be
entered in the start scripts. How this is done depends on the
distribution you are running, but usually the entry must be made in /etc/rc.local.
Debian-based systems, on the other hand, read the /etc/hdparm.conf configuration file on system startup. In it is a section for each hard drive with the following format:
/dev/sda {
  ...
}
Modern Linux systems randomly allocate device names (sda, sdb). To assign the hdparm settings to a specific drive permanently, use its specific UUID:
/dev/disk/by-id/ata-SAMSUNG_HD103SJ_S246J1RZB00034 {...}
The
settings belong between the curly braces. Each parameter has its own
name. Acoustic management is set, for example, to the value of 128 with:
acoustic_management = 128
Which name belongs to which hdparm parameter is revealed by the comments at the top of the file.
Conclusions
Hdparm
also includes many other parameters that can be quite dangerous. For
example, many SSDs can be protected with a password, which can lead to
data loss in some situations. It’s not a coincidence that the man page (man hdparm) warns about the dangers.
Incidentally, hdparm is only one useful tool among many; for example, the smartmontools can determine the health status of a hard drive.
Comments
Post a Comment